
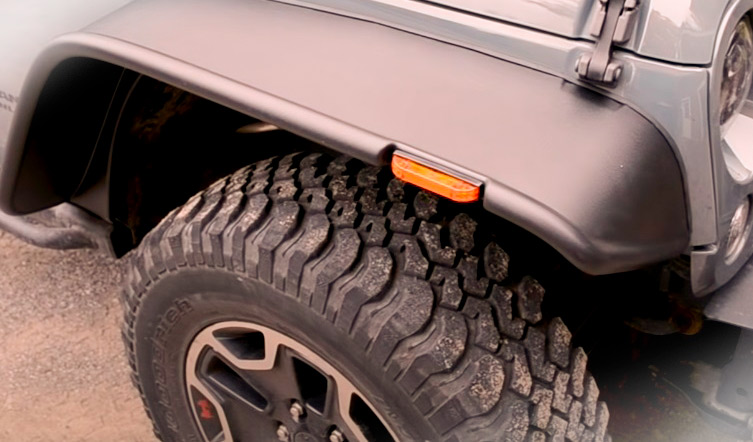
Hey drivers! Here I’m walking you step-by-step through installing a set of Bushwhacker flat fender flares for a 2018 or newer Jeep Wrangler Jael. Let’s start!
Required Tools
Now you need a few tools to get the job done. You need a paint marker, a spray, or scissors, a file is handy to clean some of these cuts, you need a ratchet small extension, a four-millimeter Allen key, a 9/16 deep well. You also need a half inch wrench, a pair of wire cutters, a pair of wire crimping pliers, an impact wrench with a Phillips bit will come in handy. I also recommend that you have some anti-seize on hand along with an awl, a Phillips screwdriver, a small flashlight that comes in handy when you’re working under the jeep and looking into the fender hollows.
Of course, have goggles on that air saw and then a few nut certificates, which you will now also discontinue. Also, you need a 9/16 wrench and an 11-millimeter socket wrench or you can use something like the smittybilt Nutsert tool, so that you have your jeep already prepared. You can start installing your new Bushwhacker flares!
Installation Steps
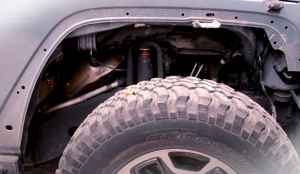 1. First, move on and remove your wheels and tires and your factory flares. The first step you need to do is put some Ertz nuts into the sheet metal ahead of time. That will be used to attach the inner fender mounts is now a really nice thing about these Bushwhacker flares that no drilling is required, which means that any factory-made holes in the sheet metal will be used. If you lick some of the paint there, you won’t have a chance of rusting your fenders now as you will find that there are a number of holes in the fender here, some of which are now not being used for your front flares. You are going to install ten nut certificates. But the easiest way to check which holes are being used is to grab the brackets that hold them in place and you can map the holes that you are going to install.
2. The back hole is what you want to put your nuts in. You’re not going to use that hole in front there, now Bushwhacker is giving you a Nutsert installation tool. It’s basically a screw and nut with a knurled edge on the front. Here you slide that nut over the bolt and then install one of the nut certificates on this assembly.
3. Now you can grab a 9/16 wrench and you want to keep this all together, with one hand insert the nutsert into one of the holes in the fender and then you can grab an impact wrench with an 11-millimeter socket. Just do this with a ratchet, but I’ll tell you that if you have an impact wrench, it will go a lot smoother, the tool will work better and there is less chance of screwing up this job.
 4. Basically, you have to hold it all together and you will hear the tool start to strain itself as it compresses that Nutsert and right there you can hear that tool strain a little bit. I know Nutsert has been compressed, you want to make sure you don’t over tighten the nut certificate, you could run the risk of tearing these threads out. Then push that back out and as you can see, the nut certificate has been compressed and you put the set in your sheet metal.
5. Now there is an easier way, especially since you will be doing this work repeatedly. Install the nutsert on the mandrel of the tool and simply install the nutsert into the sheet metal by squeezing the arms together. You can use the included tool if you have to. But this is a medieval tool that makes the job a lot easier, you will install the rest of these nutserts on the front.
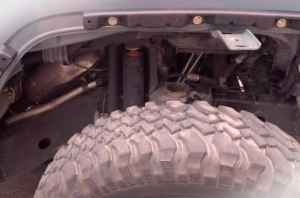
6. There are a couple of the factory holes that you won’t be using when opening one on the back and one out of the wheel on the front wheel that you don’t use, neither do you use this hole which is outside of the recessed fender area and the only other confusing one spot could be right there where you have two factory holes side by side in. The quickest way and the easiest way to confirm which hole you need is to grab the inner fender bracket and line it up with the other mounting holes. You have to reinstall, so that you can mark it for trimming with the new Bushwhacker fenders, you can use both a paint marker, a grease pencil, really everything that is easy for you to see when trimming after you have marked it.
 7. So, if you trim too much, the liner will fall out of these flares, it won’t be safe. If you don’t trim enough, the flare won’t be able to sit all the way up against the body of the jeep, so it’s always better.
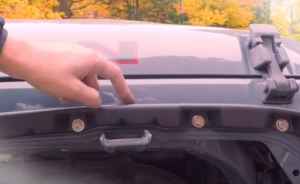
Now that your inner fender line is all trimmed, you can see you have a little more left to adjust the markings you made so you can move on to testing. Once you have the fender in place, you can put the liner aside in a moment and then move on! When you attach those two inner fender mounts, the one on the front is right above these two tabs and the one at the back will sit and go all the way down. Just hook these up on the nut certificates you recently installed the sheet metal into.
Now you have one last fastener, you have this flange screw washer and lock nut, and you are going to use this to attach this front bracket to this front mounting bracket. You attach these from the bottom up, so the screw doesn’t hang down. You can snap these units and place them along the bottom edge and install these inner support brackets. There are two up here on the front bracket and then there is another one on the top of the second bracket and four more.
Now you can grab the last two units and install these directly onto the two factory brackets. The front here will align it with the factory holes that were already there and as with all of the units you installed on the inner support bracket, you’ll want to make sure these are small lip points upwards so that the screw engages then you can continue and take the carriage bolts from earlier together with the lock nuts. Then grab the Christmas tree holder again and now reinstall here on the front of your inner fender liner.
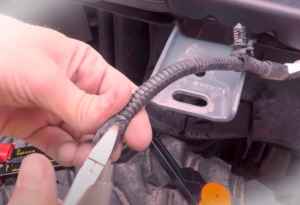 The final step and this might be the most nerve here is cutting and severing that factory wiring. You’re not going to reuse any of the factory lights here, so cut the wiring right behind the front marker and side marker and you just have to leave a little pigtail on the end of each one, you can get your fender out of the way. If you get one set of snaps of crimps, you will be using these bullet-style connectors, all of which are included. Just use five of these. Strip some of the wire from each of the five wires and crimp one of the crimps. Once you’ve taken care of the body side wiring, you can put that aside and your Fender Flares for Jeep and the two kit-included lights that you need to fit into the fender flares.
Plugging the Wiring
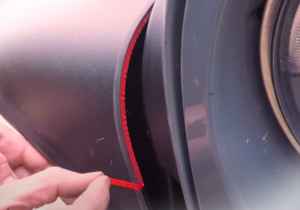
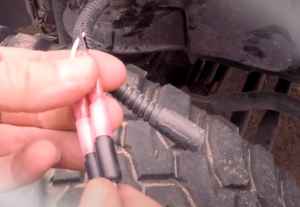 Start plugging the wiring into that rubber grommet and then you can fish that up on the front of the fender. Now grab the five remaining male ball connectors and crimp these onto your marker lights. While you have your fender on the table, this is also a great time to attach the rubber edging trim to the top of your fender. Now grab one of the alcohol prep pads supplied and wipe the inside edge of your fender, where the double-sided tape will stick.
Once you’ve given the alcohol a minute to evaporate, grab the edge trim and come with it. and start peeling an inch or two of the backing tape. When you get to the bottom of the flare, just cut off the excess moldings that aren’t needed, finish the gluing and then you can attach your wiring here on the body side. Then just plug the factory plug back in and make sure the red locking tab is pushed in, and then if you want, you can just loop the wiring up here behind the inner liner that pulls it out here near the front where you make your connections with the new fender flares. Let’s go with the cables, plug them in this duct.
Cables Work
If you can snap your fender flares, you can somehow support that only two wires have to be connected here in the back and on the yellow side marker and that is a simple black cable to black cable and red cable to the white cable. Now you can mount your fender over the inner support. Once the fender is in place on the jeep, you can snap up this little white plastic hook tool that the Bushwacker provides to fix any spots where the rubber edging strips have been hidden.
Once all nine screws are installed and you are happy with the assembly, you can go ahead and go through these and tighten. Once all the screws are tightened is the final step to install one of these snaps in the last hole down here on the inside of the torch.
Final Steps
 Now that you’ve installed, the final snap fastener down here, depending on how well you trimmed your inner fender, you may have a gap which now shows that you’ll happily take the extra step of drilling a quarter hole Inch hole through the lower edge of the fender insert and through this plastic bracket directly under the one factory lock there it is the perfect place to reuse one of the factory pressure locks who did up front. At this point you can grab your inner fender trim that you removed and hold them here again, so you can mark them.
Whatever you have on hand will be easy for you to see while you hold the trim in place, and all you need to do now is mark around with the body of the jeep. When you get to the two mounting tabs one front and one back, make sure we leave these in place. Don’t cut it completely from now on, you can pull the clips out of the way again and grab a pair of scissors or aerosol whatever tool you like, cut it off again, it’s better to put it on the side, leaving something too much that you can trim later instead of trimming too much the first time.
Rubber Edge Trim
Check out all of your cut lines, so once you go ahead and do all of the trim adjustments you need, there is a lower splash guard down here. But you have some more of the rubber edge trim you need to attach to the outer lip of the fender flare, just like you did with the front. You start with the alcohol prep pad wiping the inside and then install the rubber trim all the way around. At the rear, stick a clip through the fender, the panel and then into the body. Then take an awl and a flashlight and use the awl to make sure that each of these is in place with the mounting hole on the bottom of the flare and then you can start reattaching it with the phillips head screws, easy only fasten loosely.
Then install a factory Christmas tree mount in that top hole to make sure the inner fender trim is also secured with this clip, then you can grab two of these pressure type clips bring the inner liner behind your fender flares and finally one final push type clip towards the front edge of the fender this last clip completes the installation on your rear fender flares. Please reinstall the wheels and tires and then of course repeat the same procedures on the passenger side of the Jeep.
That’s It!
If you have any comments or questions about installing one Bushwhackers set of flat fender flares on your 2018 or newer Jeep Wrangler prison, of course you can leave these sports in the comments below!
Add Comment