Do you know what the booster does? Essentially, it’s a complex mechanism that makes it easier for the driver to hit the brakes. The booster achieves that by reducing the necessary pedal pressure for successful braking. For that, it uses a vacuum pump or “borrows” the vacuum from the motor’s intake. Without the brake booster, you might not be able to stop the car in time.
So, if you feel like it takes you a lot more effort to hit the pedal and engage the brakes, most likely, you’re dealing with a bad brake booster. A brand-new unit will cost 70-80 US dollars, or even less. And in this guide, we’ll master the art of brake booster replacement on a Chevrolet vehicle. Let’s get to it!
Common Symptoms of a Bad Brake Booster
Before moving on to the meat and potatoes, I want you to take a quick look at the most common side effects of a faulty booster:
- Tough braking with no braking assist
- Longer stopping distance
- Power steering fluid leakage
- Hissing, rattling noise
- A warning light on the dashboard
If you’re experiencing any of these brake booster symptoms, it would be wise to stop the Chevy in a safe spot and run a full check. Or, better yet, call a tow vehicle to take you to the closest auto shop.
Removing the Stock Brake Booster
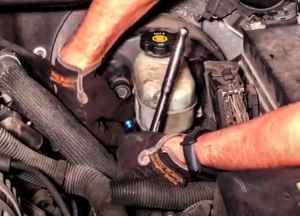 The best thing about this procedure – you won’t have to climb under the Chevrolet. Just pop the hood and find the so-called master brake cylinder (MBC). You’ll see it sitting on the firewall, with several brake lines connected to it. As for the factory booster, it’s right there next to the MBC, facing the cabin of the vehicle. Our job is to remove it. Start with the nuts – the best tool for this is a socket wrench. Leave the studs exposed.
Then, carefully grab the vacuum line and disconnect it. You won’t miss it, as the line “feeds” right into the brake booster. The rest should be done from the cabin. So, moving on with the how to remove and replace a brake booster on a Chevrolet routine, open the door on the driver’s side and locate the brake pedal. I recommend moving the front seat as far into the back as possible to make room for yourself.
Disconnecting the Booster from the Inside
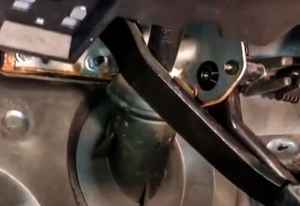 Grab your favorite flashlight and point it towards the area where the brake pedal is. You’ll see four bolts/studs with lock nuts on them; they’ll probably be covered by cushioning. The one in the top right corner might be tricky to reach: I used a 15mm swivel socket with an extension for this. The bolts in the top left corner and at the bottom won’t be hard to remove. Do remember about the insulation, though.
The next step is to remove the tiny clip that’s holding the brake switch. It’s gonna be a bit hard to take off: moving it around and prying at it with a small screwdriver should do the trick. So, now that there’s nothing keeping the factory booster in place, go ahead and remove it.
Installing an Aftermarket Booster
Alright, we’re almost done with this how to replace brake booster Chevrolet guide. All that’s left to do is repeat everything we just did in reverse. Put the new booster in and make sure the studs (four in total) are in perfect alignment with the mounting spots. Next, put the brake pedal on, slide the brake switch, and “stick” the clip on. The nuts on the studs should be tightened from the other side, of course (the cabin).
And do keep your eyes on the wires/cables in Chevy’s hood. Make sure you don’t pinch anything, as that can cause you one big headache in the future. Last, but not least, reconnect the vacuum line and check on the master brake cylinder: it needs to be nice and secure. If everything’s looking good, start the engine and take the new brake booster for a spin!
Add Comment