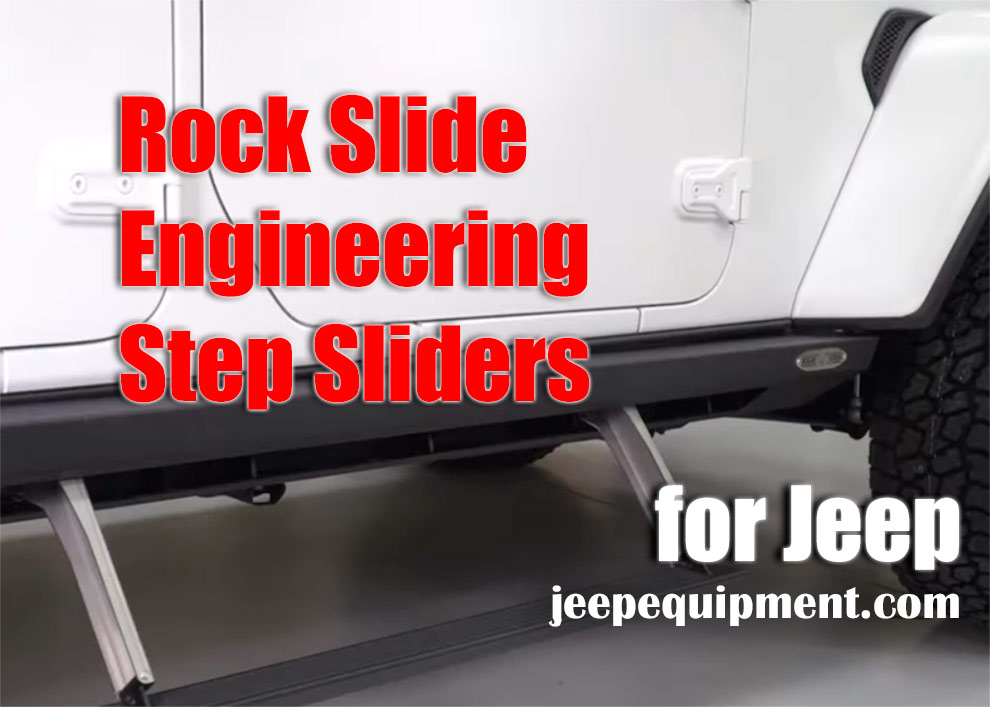
Hey guys! Today, I’m going to be walking you through the steps required to get a set of Jeep Rock Sliders along with an optional lighting kit and skid plate. Alright, let’s jump in!
Instruments
To install on a 2007-2018 Jeep Wrangler JK there are a few tools to get this job done, you need a drill, an impact wrench will come in handy, you will also need a set of drill bits, a torque wrench, a centering bar a plate tool, a razor, an 18mm socket, one half inch socket, a 10-millimeter socket, a 7/16 wrench and a 1/2-inch wrench. If they are ratchet wrenches they will do the job well a lot easier for you.
Replacement
-
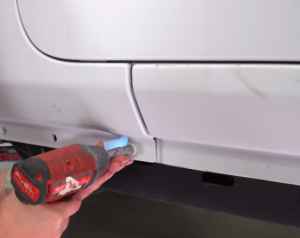
The first we need to remove the two 10-millimeter screws on the pinch seam on the driver’s side. If you loosen the three-body mounting screws with an 18 “millimeter socket, you don’t have to remove them completely, just loosen them enough, so that you have some play in this washer and don’t slip into the new brackets. If your Jeep actually has a long wishbone suspension, your third body mounting screw is a little block back from you, if you are using a socket using a factory hanger that you can easily get to, you need to use a wrench to loosen it. So, if you have loosened your three body mounting screws, you can install the new brackets and you will get three brackets per side. You will get a long bracket
 a medium-length bracket and finally a short and also larger bracket.
 -
Now starting from the back, the longest bracket first mounted by simply sliding the bracket between the washer and the head of the screw, then you can install the middle bracket in the middle body bracket and finally the shortest bracket is mounted on the front fixing screw. Now you need to let all of these loose, you come back and then pull them tight. Once you’ve installed the sidesteps next, you can go ahead and test the fit. The bumper bar fits right on the lower part of the rocker panel on the body of the Jeep just below the body line where you want to test the fit. There is a notch there that lines up it with the seam on the body and you should position it just below that spot the body rolls on the rocker.
-
Once you know where you are going to position yourself, you can go ahead and adjust it aside. Grab some alcohol pads and clean that area. Once your rocker is thoroughly cleaned, you can peel off the VHB tape and now glue the bumper strip to the rocker, before you attach the step slider to the pinch weld that you want to make sure you grab the harness for the motor and pull it through that access hole on the back of the mounting flange. After that you can mount the valve gate through the holes in the pinch weld. Once it should be hanging alone, so you can start installing the hardware so that the six bolts that are pre-installed on the valve gate are the being installed by the holes in the pinch weld. Actually, there are two different sizes and you will be using two quarter twenty locknuts and four 5/16 18” locknuts along with the corresponding stainless-steel washers. The smaller quarter twenty locknuts will be installed on the second bolt if you do from the front.
-
Move the side of the vehicle in both the first window and the second bolt in the second back window. As you move towards the rear of the vehicle, your larger 5/16 eighteenth lock nut will be on the first bolt in the first window, the first bolt on the second window and finally installed on both bolts found through the third back of the window you can tighten these quarter-twenty locknuts with a 1/2-inch wrench. You can tighten these 5/16 locknuts with a 7/16 wrench, and weld these six lock nuts loosely onto the mounting studs through the pinch.
-
Now you can install 12 of the 5/16 18 x 1-inch hex bolts into the bottom of the step valve and align the slider slightly with the mounting plates you installed on the body sooner bounce off. These locknuts on the pinch weld first, then you can come back and the 12 hex head bolts that hold the valves with these Join mounting brackets, fully tighten, and then finally you have to go back and tighten those three body mount screws to tighten these two 80-foot pounds each and finally you can reattach one of the factory screws to the foremost point of the pinch weld. Now you have the driver side installed, you have also installed the passenger side steps and at this point you are ready to begin installing the wiring harness.
How to Install the Wiring Harness
-
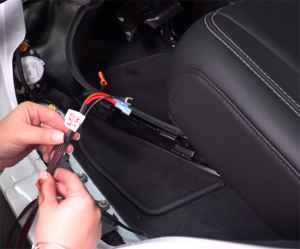
One of the really nice things about installing the Rock Slide Power Steps is that the wiring is a complete plug and play job, so you don’t have to make cuts or splicing to any of your factory wiring. All you need to install is this little wire harness that basically hooked up to the positive and negative poles of your battery and then through the engine bay and through the firewall, where you make your connection to the second part of the making the wiring harness, now the parts are going to run through the inside of your Jeep to the door clamps. There you are going to install some sensors to trigger the steps to fall down.
-
If you open and close your door, before you install this wiring harness, it is always one good idea to remove that fuse and then you just put it aside while you install it. When you’re done with the installation, you can come back later and install the fuse your first time. Part of the wiring harness went through the firewall and you have the remains down there in the driver’s side footwell. But I promise you guys, it’s a very simple to install there that you’re actually going to do. Start at the back Part of the Jeep and run this first leg of the wiring harness forward under all the panels you removed and make your first connection to the first part of the wiring harness where you installed the engine bay. The other harness
 leg has three connectors that actually plug into the bypass switch, and this switch mounts there in its own bracket that sits on top of the door latch tape bracket.
 -
Now use a ten-millimeter socket to loosen these two screws. You can slide this bracket on and tighten it again, and then with that 10-millimeter socket you will use the existing ground screw in the driver’s footwell loosen and make your ground connection so at this point you’ve made all the connections up in the Jeep. Now you’re ready to go to the rear of the Wrangler so the rest of the harness you have back there is basically split in half, one half will stay there on the driver’s side, while the second half will actually go under the carpet under the back seat over to the passenger’s side.
-
Now from the wiring harness that will stay there on the driver’s side, you will have four connectors. Here you have two smaller white connectors that are not insulated and then you have two bigger black Weather Pack style connectors, now the smaller one becomes white, not is olierte connection stay in the Jeep and the B-pillar or the C-pillar will run up to just below your door locks and there these are connected to the door switch sensors that trigger the steps to fold down. If you now open each door, they become a cable with a yellow and orange cable that goes all the way to the B-pillar and then your orange and purple wire goes back there to the C-pillar on the rear door lock, you can go on and take two of the magnetic sensors you need, take an alcohol wipe clean the back of the sensors and clean the door jamb area just below the door latch. Then you can stick and glue the double-sided tape on these sensors finally connect the wiring harness together. Once you have the sensors connected, you can pull the carpet back where you can remove the drain screw and you will cut a small washer into this drain plug. Then you’re going to fish those wires through the bottom of the Jeep underneath and reattach the drain plug leaving the one under the Jeep for now, you can pull over and finish your wiring on the passenger side, so you have everything on that Buttoned driver’s side, all of your interior panels reinstalled and then moved to the passenger side and basically repeated the entire process. Well, you’ve already mounted your door sensors right under the latches there on the B and C pillars.
-
The last step to continue on the passenger side is to go ahead and connect the control unit to the wiring harness and that will be plugged and then I like to attach that to the back with some double-sided tape you will stow it under the back seat as a floor from uphill inclines it should keep it nice and safe from danger. Once you hook that up, you can move back under the Jeep and make those connections on both the driver and passenger stairs with the cable you lowered through the drain plugs. Then you can finally install your door magnets on the inside of the door jamb of each door.
-
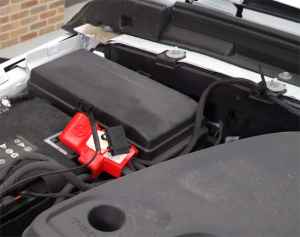 The last step is of course not to forget to go ahead and reinstall this fuse under the hood, to now complete your wiring with the stages switched on, you can lower it so that you have access to the lower pinch seam, so that you can reinstall one of the screws, which you originally removed. Once you have all of your magnets in the correct position, you should be able to walk around the Jeep and check the correct functioning of the steps by moving each one.
Check It Out
Open the rear passenger door as soon as the steps are in the lower position. Go ahead and turn off the override switch installed in the driver’s footwell using these extended steps to lock them in that position, so you can close the doors without fear of the steps trying to get back in. To raise the closed position, you simply go ahead and peel off the 3 m long double-sided adhesive film from the back. The LED light strip guides the lights behind the gusset of the step valve and then glue them directly to the body of the Jeep on the lower sill part, so that they can be brought into the perfect angle to shine through the opening of the step cider and now light the step at night as much as the wiring you just want to fish through the opening on the back of the step slider. Then plug it into the weather pack connector you left hanging under the Jeep.
How to Install the Optional Skid Plates
However, if you install the optional skid plates like we did, there are a few more steps you need to take to complete the skid plate sandwich on the outside of the step valve and they will be secured with the lower 12 mounting screws. But before you can do that you need to do this too. Remove the Rock Slide logo attached to the step slider so that the underrun protection plate is flush with the step, you continue and grab a drill and simply drill out these two rivets and you can move the logo plate out of the way, then you can continue and the 12 lower ones. Remove screws and you can slide the skid plate in place may need a centering bar to realign these holes, let all 12 screws start up first and then you can turn them all back and tighten, which will install your stone slide step slaughtering along with optional hit. Completing underrun protection plates on your Jeep Wrangler from 2007 to 2018 JK of course the last step is to check that everything is working properly and I think you are ready to go now.
Of course, if you have any comments or questions about it, or how to install it on your Wrangler, you can leave them for me at any time in the comments section below. Well, drive safely!
Add Comment