
Hey drivers! Today I’m going to be installing a slip bar eliminator kit and new driveshaft in a Jeep Wrangler Lift Kit. And we will take a look especially at Jeep Cherokee Driveshaft U-joint Replacement. When I did that, I installed a transfer case lowering kit to eliminate some of the common driveline vibrations that come with the installation when a lift rate occurs. This is a great option, and it usually covers any vibration associated with it.
However, the best way to fix this is to install a slip yoke eliminator kit commonly known as a SYE kit and a new driveshaft to get those driveshaft angles back where they should be and the transfer case to put it back under the Jeep, so that you don’t lose any ground clearance. Well, let’s take a look at the installation process!
Preparation
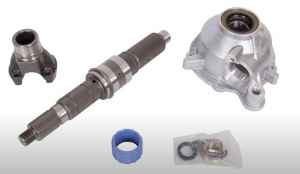 First, let’s understand what each component does and how it helps improve the transmission angles of your Jeep. So, choose the Rugged Ridge Slip Yoke Eliminator Kit, it includes a new output shaft for the transfer case, output shaft, housing yoke, speedometer as well as the other various parts required to complete the installation transfer case, which allows you to fit in a larger driveshaft. To reduce those driveshaft angles, choose a custom Tom Woods driveshaft with additional benefits, including grease fittings on all the U-joints and on the driveshaft itself.
The main benefits of installing such a driveshaft are that you’ve moved the adjustability from the back of the transfer case down to the driveshaft itself, going from a really short, fixed length driveshaft to a much longer adjustable driveline which helps you decrease the driveshaft angle. Try to bring the transfer case in and set it up on the table. I will walk you through the installation steps.
Installation
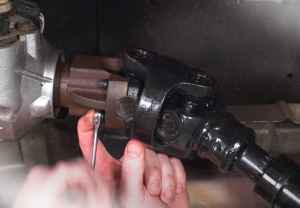
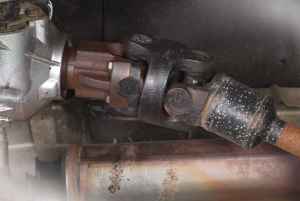 1. First remove the screws that hold the U-joint belts to the yoke on the rear driveshaft, then remove the belts and stock driveshaft from the Jeep.
2. Next, remove the transfer case, underrun the protection plate so that you can access the transfer case and the front driveshaft. Then remove the drive shaft on the transfer case side and support it with a rubber cord or belt.
3. Next, remove the transfer case shift linkage, the rubber hose from the gearbox mount and next the 2 electrical connections, remove the transfer case drain and filler plugs, make sure you have a drain pan that holds at least 2 liters of fluid before installing the drain plug. Then remove the transfer case completely drained, start removing the nuts securing the transfer case to the gearbox. As soon as you have the transfer case on the workbench, remove the dust cover on the output shaft and the speedometer gear.
4. Remove the assembly and the yoke, dust cover, and rear output housing by removing the snap rings that are next in front of the output shaft bearing the oil pump housing, then the screws that hold the housing halves together after you separate the housing. Now remove all sealants that remain on the mating surfaces, remove the 2 output shafts and the drive chain at the same time.
 5. Once you have the rear output shaft on the workbench, you can remove the retaining rings that hold the sprockets in place. It can be helpful to use a flat-bladed screwdriver in addition to your circlip pliers to remove the rings, slide the stock sprockets onto the rear output shaft and replace the snap rings. Next, reinstall both output shafts and the drive chain at the same time. Apply a thick bead of sealant to the rear case half, making sure to surround the screw holes.
Reattach the suction tube to the oil pump housing and make sure to next line up the transfer case oil filter while holding the oil pump in place, aligning the housing halves line before pressing them together. Next, put the transfer case bolts back in and tighten them in an alternating crisscross pattern, then the next circlip and the speedometer wheel, followed by another circlip, apply sealant to the rear output housing on bolt holes. Align the output housing and after tightening the bolts, partially push in to hold the sealant in place.
6. Well, install the output shaft spline seal, followed by the new washer and nut for the rear output yoke. After tightening the yoke nut almost all the way, ATF + 4 that you will be using to fill the transfer case, then install the speedometer gear aligned according to the marking or the picture of the disassembly and attach with the same screw original front output bracket with seal, washer and retaining nut and a small one bead sealant.
Final Steps
Okay, now you’ve reassembled the transfer case with the brand-new sturdy. First, sliding bracket eliminator, you’re going to give it about half an hour for the seal maker to set it up, then you bring it back to the shop, leave Reinstall it in TJ, fill it up with some Mopar ATF + 4, leave Tom Wood’s drive shaft installed and you are ready to hit the trails. Install the transfer case back into the Jeep and remember to reconnect the hose and both electrical connections, then reattach the transfer case shift linkage front driveshaft and gear bracket, install your new rear driveshaft then fill your transfer case with ATF + 4 within a 1/4 inch of the bottom of the filler port and replace it with the plug. Finally, reinstall your skid plate to complete the installation. Well, that’s it! Drive safely!
Add Comment