Hey guys! Here I will explain to you the right steps to safely and securely install a set of Wheel Spacers for Jeep or adapters on your Jeep. Today I’m walking you through the steps to properly and safely assemble a set of wheel spacers on a Jeep Wrangler.
Now you can install a set of wheel spacers or adapters for a variety of reasons. You can install them to simply push out your factory wheels and tires to look a little flush with the edge of your fender flare or maybe you have already installed or are going to install a set of larger wider oversized tires and need to gain some extra clearance behind the tire, or eventually you might install a wheel adapter to change your screw pattern on your jeep. Okay, let’s start!
How to Install Wheel Spacers
So, the Jeep has 5 stud bolts, if you were to draw an imaginary circle around all of these stud bolts and measure from a stud bolt directly across the diameter of that circle, it would be 5 inches, there are these five on five number comes from, so you can see that you are going to install a set of spacers, which are labeled 5 x 5 2 5 x 5. That means you’re not changing the bolt pattern, you’re just installing a spacer. These installation steps apply regardless of what brand of spacers you are about to install on your Jeep.
For example if you have an older Jeep Wrangler TJ or maybe a Cherokee that came from the factory with a 5 by 4 and a half inch bolt circle diameter, but you want to mount some newer 5 by 5 JK wheels that the adapter bolted up to – your Jeeps hub and then give it to you the new 5-on-five bolt pattern, so you can mount your new wheels.
Necessary Tools
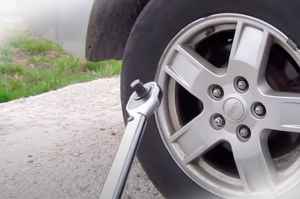 Now you need a few tools to do this job. Of course, you need a set of wheel spacers or adapters for your specific application, you will need the set of wheel nuts that come with the adapter to attach to your Jeeps hub. In your case, the Quadra Tech spacers include a bottle of red high strength thread locker, if the spacers are the adapters you are using that don’t include, you should walk to your local auto parts dealer and pick up a red high strength thread locker. You’ll also need a torque wrench, so you can properly tighten not only the wheel nuts on the wheel and tire, but also the wheel nuts. If you get in a large spacer as well as an appropriately sized bushing and finally this is optional but you may need a large one crowbar. Before you can start with the first thing, you have to jack up the front of your Wrangler, so that you can always get the factory rims and tires out of the way when working under your Jeep or removing wheels and tires.
Make sure you put your emergency brake on and then use a jack to raise the vehicle, but never entirely rely on that jack, make sure you always use a jack stand under the axle. You may think that you are ready to start installing your new spacers on the hub of your Jeep, however depending on the age of your Wrangler or whether or not any braking work has ever been done that, you need to get it check carefully to see if you have those brake disc or drum retaining brackets on any of the wheel studs. It is now important that you remove these before you install your new spacer.
Installation
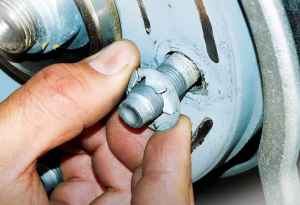 If you look at the back of the factory wheel, you can see that the factory is actually putting these clips with these little cutouts around each stud pocket, if you look at the back of your spacer and you see that you have a completely flush surface there. You don’t have cutouts for these clips, so now you’ll need to remove these first. If you cut or pry, make sure you wear safety glasses and there are a number of ways you can remove them. Now that you’ve got those retaining brackets out of the way, you can start installing your standoffs or adapters.
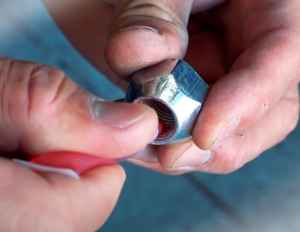 1. Install the space completely flush with the mounting surface of your brake disc and that means you need to properly install your spacers or adapters. But before you can mount these with the new wheel nuts, you need to do something and here comes this red, high strength thread. Locker comes into play that you have to put on each of the threads of your wheel bolts before you mount the new wheel nuts. This is especially important now with spacers and adapters because once you install your wheel and tire back on top of the spacer, you will lose the ability to easily check the tightness of these wheel nuts that hold the space.
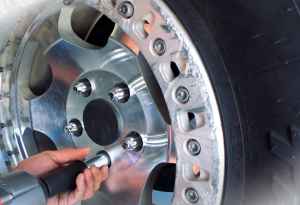
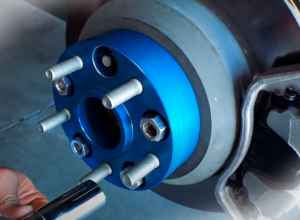 2. Drive well down the road, which could create a very dangerous situation with a threaded lock on each of the bolts. Now you can install the spacer and then begin to loosely install each of the new wheel nuts with each of your wheel nut hands. Now it is time to tighten them to spec. Now you would like to consult the manual for your specific Wrangler or Jeep to ensure that you are now using the correct torque specifications in the case of your Jeep Wrangler JK. Here the manual recommends a torque specification of one hundred foot-pounds. Now it is very important that you do not use a blow gun to tighten the wheel nuts on a wheel spacer. There are just too many variables in how tight and impact a wheel nut actually gets. You want to make sure you can go with a torque wrench and set it to the recommended 100 foot-pounds and then when you tighten your wheel nuts, the way you would do it, if you installed a wheel and tire you would like.
 3. Make sure you tighten them in a star shape around the spacer or hub to ensure the spacer is tensioned evenly as you are now tightening it normally. If you tightened the wheel nuts on a wheel and tire, that would prevent the hub from turning while tightening the wheel nuts, since you are tightening the wheel nuts on a spacer and your axles in the air here well, you have nothing to prevent themselves from turning your hub and brake disc spin on you. Now tighten every wheel nut.
 4. Now there’s one little tip I like to use when using this method because you may have to remove your crowbar and turn the hub a few turns and when you have full access to each of the stud pockets it’s easy to confuse which ones. You tighten the wheel nut and you don’t want to forget whether you have already tightened one of the wheel nuts or not. So, I like to take a paint marker or some sort of pen and just put a small mark next to each wheel nut when tightening it. If you have properly tightened each of the 5-wheel nuts to the factory torque, you know that you are doing your widening correctly and safely mounted on the hub of your Jeep.
5. Tighten the Original Equipment Wheel Nuts. Put the Jeep back on the ground and retighten those wheel nuts to the same factory torque specifications following this star pattern. Work your way around the Jeep more often.
6. The final part of installing wheel spacers or adapters is to come back, after driving about 50 miles of road on the jeep, remove the wheels and tires and check that. All of these wheel nuts are now still tightened to this factory specification!
That’s It!
Well, if you have any comments or questions about the correct installation of a set of spacers or spacers, or if you have any other recommendations, you can leave them for me in the comments section below. Drive safely!
Add Comment