Changing your tires can be a daunting task, especially when it comes to removing old, worn lug nuts from your wheels before you can replace them with new ones. If you find yourself in a situation where this is the only option, don’t panic – with the right tools and safety precautions, drilling out lug nuts can be done safely and effectively.
In this comprehensive guide, we will outline the step-by-step process for drilling out lug nuts, from what tools to use and safety precautions to take. So whether you’re a professional mechanic or someone who enjoys working on their own vehicle, this guide will help you successfully remove those old worn bolts.
Why Do You Need To Drill Out Lug Nuts?
Drilling out lug nuts may be necessary if your existing lugs are severely worn or corroded due to age and weathering. Over time these bolts can become excessively corroded or stripped from regular use of a tire iron; when this happens it can become difficult or even impossible to remove them without damaging them further. Drilling is often the only choice left in such cases, as it allows you to break through the old bolts without damaging other components of your wheels.
Pre-Drilling Safety Checklist
Before beginning any project that involves using power tools such as drills or impact drivers, always make sure that you take all necessary safety precautions. Make sure that you are wearing the appropriate safety gear, such as goggles, gloves and a face mask to protect yourself from flying debris. Additionally, ensure that you have cleared away any debris or objects from the area that could be damaged by your power tools.
Step 1: Selecting the Right Tools for the Job
 The first step in drilling out lug nuts is to make sure that you have all of the necessary tools for the job. You will need a power drill or impact driver, as well as an appropriate bit – either a Phillips head or flathead bit depending on your bolts. Additionally, it can be helpful to also have some lubricant such as WD-40 on hand to help reduce friction when drilling through corroded or stripped lug nuts.
Step 2: Remove Any Wheel Coverings and Set Up Work Space
Once you have all of your tools ready and safety precautions taken care of, it’s time to start preparing your work space. Begin by removing any wheel coverings such as hubcaps or trim pieces; this will give you better access to the bolts so that they can be more easily drilled out. Once these are removed and set aside safely, set up a steady work surface and make sure that the drill or impact driver is securely attached and ready for use.
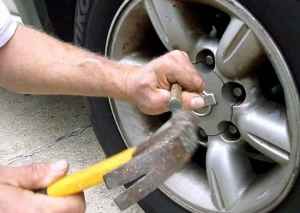
Step 3: Use a Hammer or Impact Driver to Cut Through The Worn Bolt Heads
Before you begin drilling, it can be helpful to use a hammer or impact driver to force the bit into the worn bolt heads. This will help break away any rust or debris that has built up over time, allowing for smoother drilling once you start using your power tool. Be careful not to apply too much pressure here as this could cause further damage; instead, just use enough force to get the bit started in the holes before moving on.
Step 4: Securely Attach an Appropriate Bit To Your Power Drill Or Impact Driver
 Once your bit is firmly in place, you’re ready to attach it securely to your power drill or impact driver. Make sure that there is no play between the two pieces – if there is, it could result in an uneven drilling process and possible damage of other components of your wheels. Once everything is firmly secured and checked twice for safety, you’re ready to move onto step 5.
Step 5: Apply Pressure Evenly As You Begin Drilling Into The Lugs
Once your bit is securely attached, you can begin drilling into the lugs. Start slowly, applying pressure evenly and gradually increasing the speed as you go. Don’t rush, as this could result in an uneven drilling process or even damage to your wheels. As with any other type of power tool use, always be aware of your surroundings and take all necessary safety precautions.
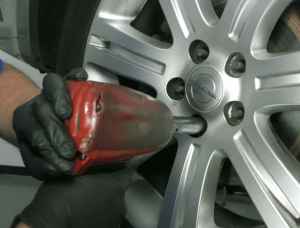
Step 6: Clean Away Debris From The Drilled Area
Once you have finished drilling out the lug nuts, it’s important to clean away any debris from the drilled area before moving on to replace them with new ones. This will help ensure that everything is secure and prevents any potential rust or corrosion build up in the future. Use a wire brush to remove any remaining rust or debris and then use WD-40 to lubricate the area before replacing with new lug nuts.
Conclusion
Drilling out lug nuts can seem like a daunting task at first, but with the right tools, safety precautions and step-by-step process outlined here it can be done safely and effectively. With this comprehensive guide in hand, you should now have all of the tools necessary for successfully removing worn bolts from your wheels – all you need to do is put them into practice.
Add Comment