Hey drivers! Today I’ll show you how to install a Mopar soft top on your Jeep Gladiator. These installation instructions apply to two conditions. It should be a fairly straightforward installation that should only take about an hour for you to get the job done. You can do most of the installation using the Jeep toolkit that came with your Gladiator from the factory. Let’s start!
We will use the t40 torx bit as well as the t-50 torx bit from the kit along with the ratchet. The only additional tool we need is a Phillips screwdriver. Now the installation guide that came with the hood mentions using a torque wrench, but keep in mind that most of the fasteners that have been installed go in plastic and most of the torque specifications be under about 10 foot pounds, so we don’t have to go crazy turning things down pretty tight – hand tight will just work great for any fasteners we need to install but before we can start assembling the Soft Top for Jeep.
Installation
1. Of course, the first thing we had to do was remove the hardtop from the truck. Then you need to grab the parts that form the rear belt track assembly. These now consist of a long piece that runs across the back of the gladiator’s body as well as two of those 90-degree corner pieces. If we have these on the table, you will also need to grab the four Phillips head screws, now these are the only Phillips head screws that will in the entire assembly process you will of course need your Phillips screwdriver, a small package of 3m adhesion promoter and this seal, which we will install.
 2. The first thing we need to do is turn this largest piece of the belt rail assembly upside down and then grab the two corner pieces. These are labeled. Each of the pieces has a left and right mark on the bottom. We need to look at this point, don’t care so much about these markings as these pieces fit together like puzzle pieces since they really only fit together in one way. You can see that if you line them up here, the trailing edge and the leading edge will fit together. We can snap any piece into this larger part and then grab these four Phillips-head screws and at this point just insert them into the two mounting points between each corner and the straight piece of the bracket.
3. Here we don’t tighten this, this is where the cardboard template comes in by placing the outermost hole of the template on these positioning posts on either side of the bracket. Make sure that once you’ve installed all of the mounting holes on the back of the bracket are properly aligned, once you’ve put that on there slide each side in and out easily, have the gap on both sides too and make sure all of your mounting holes line up.
Now we can tighten the four screws over. Then wait a minute or two for the application to evaporate. We have a little starting tab that will help you peel off the backing strip. Here you can see the glue in two separate ones. Strip is broken and you need to align it with both the back edge and the inner beveled edge, start on one side of the belt rail mount and work your way all the way to the other side. If you have anything left, you can just cut that off.
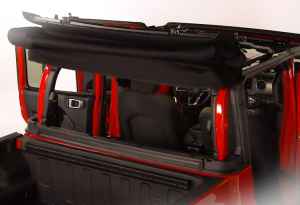
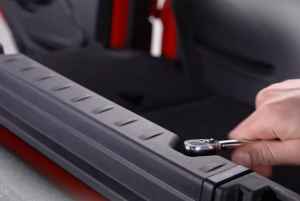 4. The next step is to mount this on the body of your gladiator. We’ll need the Jeep tool kit that will allow you to grip the ratchet as well as our T 50 Torx bit and we will screw this down with six of the short T-50 Torx screws on the back of the Gladiator, we can use the belt rail assembly with the two locating pins on each corner to position them correctly and then tighten those screws.
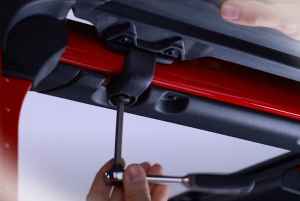
Next, we can add our front door panels to both. The two hinge parts should line up with the recesses in the sports bar trim, if you set this, just make sure that it sits above this door seal between the front door and the back door. Then install two of the forty long torx screws from below to hold the door panel in place, and then repeat the same step on the passenger side.
 5. After that, assemble the back pieces of the door panel and you need to grab two parts for each side surrounding the longer top part of the door panel as well as the shorter lower part of the door. If the two you packed are not perfectly matched, you might have to swap one for the other until you have a good match there, we will also need the gasket installed between the top and bottom of the door panel as well as two of the t4 t-short torx screws to mount them together and two of the washers. For Jeep enthusiasts dealing with unexpected weather challenges, understanding what to do if your jeep gets rained in can be crucial in preventing lasting damage to your vehicle.
When you see that there is a locating pin on one side of the gasket that goes into the locating hole in the lower part of the door panel, you can put that in place, so that this tab will fit through the gasket and make sure the outer part of the gasket sits well.
6. Then install door trim on top of the sports bar. And make sure that it sits in that door seal between the front and back doors. If you install it now, getting this into position is going to take a bit of practice, but after doing it a few times you can kind of set it up. If everything is properly positioned, it will fall just in place.
 7. The last thing you want to make sure you don’t crush that door seal on the back opening of the door, it should sit behind the lowest hanging part of that door panel. Once everything is in place, grab two those long t40 torx screws and mount them from below. You also have a tab there on the back that aligns with your belt rail assembly, so start sliding the top edge under your canopy and then align that tab with a slot in the belt rail.
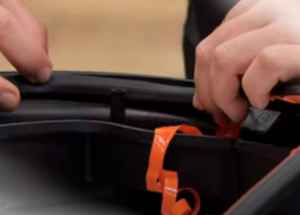
Finally, insert this plastic tab into the slot there on the front edge on the outside of the corner. There is a piece of hook and loop that will hold it in place, which is secure after installing the driver’s side. Now install the rear window. Also read here about the Window Tint Scratch Repair.
How to Install the Rear Window
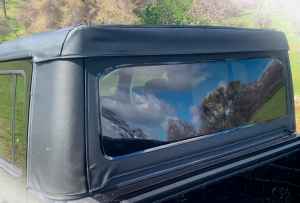 There are none Zippers on the rear window of the gladiators’ canopy, it’s held up there by a channel sewn into the canopy, and just start sliding your rear window into that channel. Once you’ve got the rear window in place, the next thing you need to do is attach the sides of the window. A plastic tab is sewn on the back of the window that slips into the channel at each corner. Now the installation can be very difficult, especially the first time, which I always recommend when installing a new top. You should do this outside on a warm sunny day, so that all of the material can warm up.
Loosen the top over the windshield and fold it back, that will be the last duct that we need to install, there is another flap that runs the entire length of the window like everyone else. Then stick these into the belt track channel on one side and then work our way through the window with your rear window that completes the installation of your Mopar canopy here on your Gladiator. If it’s time for a ride and you want to enjoy the sun, you can do the two. Simply fold down the latch on the windshield and flip over the driver’s seat slide.
Okay, guys, I hope this article was useful to you! Drive safely!
Add Comment