Hi guys! An aftermarket head unit allows you to replace the stock radio on your vehicle and get better sound, more flexibility in tuning and now with the release of Apple Carplay and Android Auto we have more hands-free options and connectivity and how can you do this upgrade? What are the key steps and what tricks and techniques can you use to install your new aftermarket radio; how can you choose the right gear and how can you keep the factory? Well, let’s find it out!
Necessary Tools
You will need a number of different devices and I have a recommendation, if you buy a main unit that you stick with a reputable manufacturer like Pioneer or Alpine or JVC or Kenwood in general, I definitely recommend staying away from Chinese Android based devices that just aren’t of good quality. It has bluetooth functionality Pandora Spotify. It has Apple Carplay which is the main thing I’m installing it for, and of course we have RCA outputs and all that, so here is the device itself if we take a look at the back of course these are all of our various connection points that we are going to need to connect our RCAs to. We have our main wiring harness for the radio. Also, we need some kind of fitting kit, so this is another category of items that you will need no matter what.
 We will also need this audio cable that will be connected to the new head unit and then of course we will need our USB cable so that we can actually program it from the computer. Now I’m adding a link that actually has a great selection of different vehicle harnesses that you can get for the Jeep. I will be using this ch1 harness if you want to know which harness you need for your vehicle, or if a harness is available you can look it up on their website. We have all of these connections.
To connect it to the wiring harness that comes with our new radio, we have these connections that I actually wanted to plug into the vehicle and finally so that we can do some of the different data and functions of this connector here. If you’re curious, the last category is what I’ll call auxiliary cables, and a simple one you’ll need for each individual vehicle is an Atena adapter that allows us to take the factory antenna on this end and we can connect it to our new aftermarket head unit. But there are some other cables that are in this category and one of these would be sent to maestro as an example so you can keep your factory satellite radio.
The Installation Process
The first step for any vehicle is to flash our Maestro unit to make it a universal unit. So, plug it in via USB and then go to the Maestro website and click on Flash your module. Once connected, we see this screen. The next step will ask you how the buttons look on the steering wheel and there are several different images for you to easily identify and make the choice. Then type in the exact radio you are going to use. In this category you can actually choose what to keep and what to get rid of.
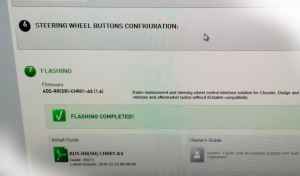 What’s really cool is that it actually gives you pictures of what the steering wheel controls look like and when you hover over them it will pop up, if you want to change any of these different buttons, you can just click that button, you can click the dropdown menu and make a selection program for different things. Now you can see the device is blinking right now. It loads all the information into it. It’s that simple and then now is the time to print out the wallet card.
Now finally don’t forget that part, here are the two different manuals we want to download to make this happen, so as soon as we open our PDF, we will each follow the steps listed. I definitely recommend reading this through before you even start the installation. and the reason for this is that I’m saying this is on the Jeep there. There’s something really important in here that if I actually get the factory UConnect functionality deleted. Next, we’re going to twist the wires together and then we’re actually going to solder the wires together. This is a pretty straightforward process that we’re going to follow using the instructions and connect the wires based on their different wire colors.
Instructions
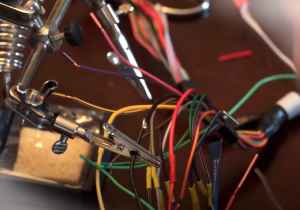 1. And there is one couple of things I want to mention for the particular installation, so these are all speaker wires from the new main unit. This is the system here in the Jeep, so I’ll be sending the audio signal into this audio control DSP via the RCA. If you want to change the radio later, there are just a few connections that you have to unsolder in the meantime. Since you didn’t connect them, you have now also covered them with heat shrink tubing, normally with a strap.
2. So, here is our new main unit, if we turn it here on its side, you can see all these holes and the main unit itself has all these different fasteners supplied and we’ll take our piece and we’ll make sure we have the right side and then we’re going to carefully align the front and then we can see which of the mounting holes we can use. We prepped our harness, we’ve prepped the radio and now it’s time to come over to the vehicle and start removing the dash before starting the installation.
How to Remove the Dash
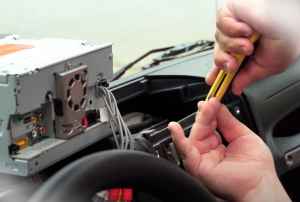
1. Always disconnect the negative battery and this will change from vehicle to vehicle but we’ll start with the jeep by removing this little window shut insert and that gives us access to this screw that we can now take out. We’re going to be placing this on our carpeted floor, just make sure none of our internal parts get damaged.
2. Next, we’re going to raise the steering column and lock it in its up position and then down there we need to remove this plate. The next two screws that we need to solve is this one that is down on the right side of the cluster, and then another one that is down on the left side of the cluster. Then carefully remove the dash panel and the trick there is that you want to slowly walk around the outer perimeter and pull gently, now we have access to the dashboard which was simple enough.
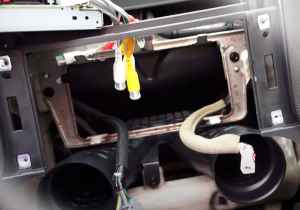 3. Now you need to take this radio out with those four screws with the radio out of the way and you can see that we have that metal plate to remove by removing the screw there and one of them is the last thing we do to prepare the radio; this part can be seen from the plastic above. Now we actually have to cut that off, don’t just chop that off completely because this is a support for the bottom line. There is the UConnect box that is actually attached with two different screws. This basically plugs back into the center console. It allows us to use the USB port that is present in the vehicle.
Then wrap the closed cell foam around the brain unit there and that will allow you to tuck it into the dashboard a bit better and not have to worry over this rattle against the plastic in the dash and add the closed cell insulation around all of these connectors and around the unit itself. Of course, you want to make sure you have electricity. Another good idea is to use the fader controls to test the front right speaker test front left back, right and of course the tests that you have a subwoofer output as well. Finally, it’s also a good time to test all of your steering wheel controls to make sure the volume control is working and everything else is working as planned.
So, now you obviously need to reverse the process and reinstall the rest of the panel.
You can also get your phone contacts, music, etc. More details about Carplay and how it works or Android Auto online can be found in another article on this website. And that’s it, guys! Have a good day.
Add Comment