
Many vehicles have a Jeep Soundbar enclosure that often houses the factory speakers or subwoofer, although those factory enclosures lack bass performance and they simply aren’t ready for a high-performance aftermarket speaker or subwoofer. What steps can we take to improve these plastic enclosures? Bass performance and better speaker performance, so we can achieve the audio nirvana we are all looking for. In the Jeep I want to put some aftermarket speakers in the rear soundbar, but before I got started, although I just want to mention that the things I’m doing can be applied to literally any vehicle. Okay, let’s jump in!
While you may not be specifically working on a Jeep, many of these techniques and materials can be incorporated into your build for great results. Let’s start with the sound treatment of this Jeep soundbar to start this project.
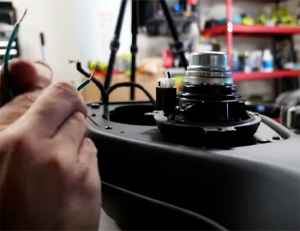
Remove the Factory Speakers from the Rear Soundbar
Once the factory speakers are removed I can remove the entire soundbar from the vehicle by now loosening six different screws. I can remove the soundbar but this may not be the case on every vehicle. Some vehicles may require you to go through the sound treatment process in the vehicle. So, let’s go through everything I’ll need for this project, besides you should keep an eye on wattage, as well, in addition to the physical size your Jeep can accommodate.
Jeep Soundbar Sound Upgrades
-
First, you need to hold onto the factory grid from the soundbar because that’s what you’ll be using to make a custom adapter next. You need some aftermarket speakers and in this case, you can use Rockford Fosgate Power Ser ies t16 coaxial speakers, for sound treatment I will use different materials, the first of which is soundproofing for the skin. I’ll also be using some closed cell foam and some Tessa tape. I upgrade the speakers in the soundbar to aftermarket speakers that are more powerful and can produce more bass, and you need to make sure you don’t have any rattle. One of the most important things that can rattle around in this soundbar is the wiring, so you need to get into that.
-
When you started poking around and looking at this wiring harness, I can tell that Jeep actually did a pretty good job, to make sure this wiring is not causing sound problems, but it doesn’t always happen with every vehicle. You may find that now you may need to sonically address some of the OEM wiring. In our case, I’m going to be running some new aftermarket wiring to these speakers which are a bit bigger so I’ll show you how
 I handle it sonically. I am making a simple piece of string and tying it to a wiring harness and the reason I do this is I can remove this whole harness from the soundbar and then easily pull it all back through again later, so I’m removing the OEM harness and it’s normal to have the string hanging on opposite ends, so that it can be easily pulled through later. To see how much wire, I need I put it on top of the soundbar then of course I cut myself in a little more, it always is better to have more than it takes than not to have enough.
 -
Now that the wires are out of the way I’ll put something up Sound Skin Sound Deadener Sound Skins is a mute layer damper product that is used to reduce resonance within the vehicle panels, thus preventing the loss of acoustic energy. What’s also pretty unique about Sound Skins is that the surface actually has a soft, closed-cell foam layer that further isolates the sound and helps decouple it from materials that might otherwise vibrate against each other, in other words, that material helps enhance bass response and it helps avoid vibration noise. It is applied simply by removing the backing material, sticking it where you want it, and then a wooden roll for that.
-
After that you need to have to leave a bit of wire sticking out, so you can reach the speaker and to prevent yourself from vibrating against the plastic. Then just to handle it well you use a piece of closed cell foam in Tessa cloth tape you start with, one Secure the end of the closed cell foam with the Tessa tape and then you wrap all the harness a serial harness in place just in case you ever reinstall the serial speakers.
-
Wrap it so it can’t vibrate against anything while you exposed the new wiring you need to stripp the wires and put in new crimp contacts to give things a finished look and to identify positively and negatively you apply heat shrink tubing and repeat this process of course for the right speaker too. You have to make a hole in the de side s soundbar to install that large format aftermarket wiring, so you can use a snip triller and then finish things by installing a grommet.
-
Once it is installed you can run the speaker wires through and you need to make sure that you have an airtight connection on the inside, so you can apply a little butyl rope so that you still have a little bit of the wiring free. You can now lead it back into the soundbar there, you can really see how using the string absolutely helped pull the wiring harness back to its original position. I definitely recommend yourself to take the time to use that little trick. The air in the enclosed space seems to be larger as it slows the air down, thus reducing the system resonance. This is a classic method to put a speaker or subwoofer a little lower and works well in the soundbar because it’s so small. The speaker can still move slightly after installation.
More Bass
Now you can just listen to the rear speakers for a moment. Overall, going through these few steps to add some soundproofing materials can make a big difference in the sound output, and best of all, that I did not notice any rattles when testing the soundbar. Thank you for taking the time to read the article. Drive safely!
Add Comment