If you own a Jeep Liberty, it is important to know how to bleed the coolant system. This guide will provide step-by-step instructions for properly bleeding the coolant system and ensuring your engine runs efficiently and safely. Bleeding the coolant system can be done with basic tools in about an hour and will save you money on expensive mechanic repairs in the future.
Tools Needed for Bleeding the Coolant System
Before you start bleeding the coolant system on your Jeep Liberty, make sure you have the following tools and supplies:
- Phillips-head screwdriver
- Flat-head screwdriver
- Socket set
- Ratchet wrench
- Coolant catch container
- Coolant hose (optional)
Step-by-Step Instructions for Bleeding the Coolant System
Once you have the necessary tools and supplies, follow these steps to bleed the coolant system properly on your Jeep Liberty.
-
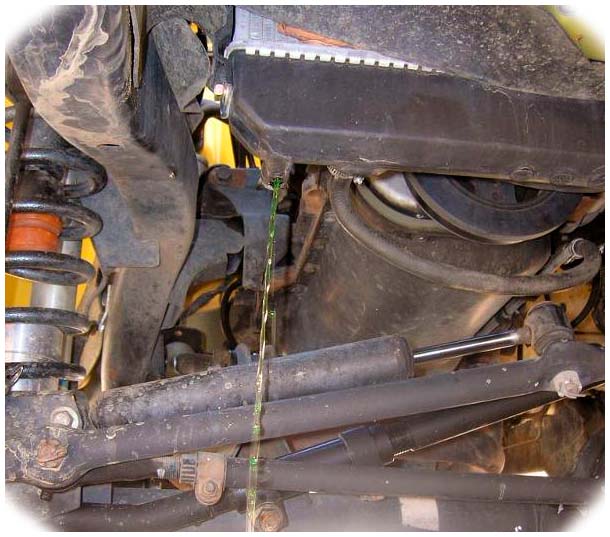 Locate the radiator drain valve on the bottom of your Jeep Liberty’s radiator. Place a coolant catch container under the valve to collect any excess coolant and open the valve using a flat-head screwdriver. Allow all the coolant to fully drain, then close the valve once you have finished.
 -
Disconnect and remove any hose or plugs from your engine block and cylinder head if present.
-
Locate and remove either one or two bleed screws on either side of your Jeep Liberty’s engine block, depending on your model year. Use a Phillips-head screwdriver to remove these screws as they are sealed with thread sealer tape when initially installed at the factory.
-
Refill your vehicle’s cooling system with clean water or antifreeze/coolant mix as specified by your owner’s manual, making sure that there is an adequate amount in both parts of the cooling system—the engine block and radiator—before moving onto Step 5 below:
-
Locate and loosen any hoses connected to your heater core, using a ratchet wrench if necessary; this will allow air bubbles and trapped air to escape.
-
Re-tighten the hose clamps and re-connect any plugs or hoses you have removed in Steps 2 and 3 above.
-
Start up your engine and check for any signs of leaking coolant from around the engine block or radiator drain valve; if it is leaking, you may need to repeat a few of the steps until all air bubbles are out of your coolant system.
-
Finally, top off your Jeep Liberty’s cooling system with either water or antifreeze/coolant mix as specified by your owner’s manual, and you are done!
Troubleshooting Common Issues with Bleeding the Coolant System
If you run into any issues during this process, here are a few troubleshooting tips that may help:
-
Make sure that there is ample coolant in both parts of your Jeep Liberty’s cooling system—the engine block and radiator—before starting up the vehicle.
-
If you find that after bleeding the coolant system there is still air trapped in some parts of it, let it sit for two hours before starting up your engine again; this will allow more time for trapped air bubbles to escape.
-
If the coolant is leaking from around the engine block or radiator, you may need to re-tighten any hoses or plugs that you have removed during this process.
Conclusion
Bleeding the coolant system on your Jeep Liberty is an easy task that can be done with basic tools in about an hour. Make sure you have the necessary tools and supplies before you start, and follow the steps outlined in this guide to ensure that your engine runs efficiently and safely. If you run into any issues during the process, use the troubleshooting tips listed above to help resolve them.
Add Comment