Hey guys, Andy Shane here today. We’re going to flush the coolant. I go through all of the steps to get all of the old coolant out, then flush the entire cooling system, and then put in brand new antifreeze. So let’s get started!
Step #1
 We’ll start by removing all of the coolants from the system, but before removing the coolant from this system. What do you wanna do? You want to make sure it’s cold. You don’t want to touch a hot cooling system. The cooling system is under pressure when you loosen caps or loosen hoses and you could be shooting hot coolant at you, and that’s never good.
So you want to make sure the coolant temperature is in the blue range or below. Let’s go under the car and look for the radiator. What is a radiator drain plug?
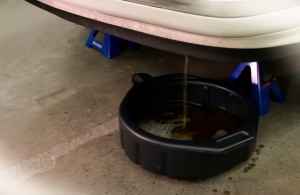
So here’s a corner of the cooler. In this case, there is another corner. It’s the corner on the driver’s side. The gas taps are almost always in the corner of the radiator and this blue thing has to be screwed off and the coolant will drain from the next step. We use a flat container of some kind. It slides under the car and is pretty low. We can go under and drain the coolant.
Step #2
 While we’re waiting for that to happen, let’s look at what we need to do to flush coolant. So here are all the tools you will need. You may need some basic hand tools, so get your toolbox down.
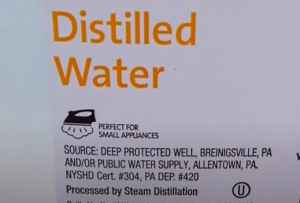
We will top up with 50-50 antifreeze. Make sure you check your owner’s manual for the correct antifreeze you need for your paper towels. We use distilled water to flush the cooling system. Make sure you are using distilled, not filtered.
We’re going to be using an anti-rust sealer and protector, and when we do the flush we are going to use a chemical flush that flushes the radiator through even better.
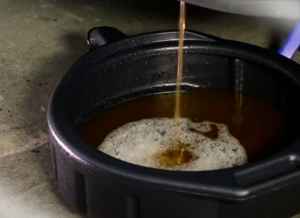
After the coolant has drained, be sure to collect all coolant and dispose of it properly so animals don’t drink it. Then we can put the drain plug back in and tighten it all the way so we can fill the cooling system with water.
Step #3
 With this car, we’re going to fill this container with water. You can see that it is emptied. Just get your funnel. This system takes three gallons.
After you fill it up completely, start your engine. With the engine running add the rest of your water. The water pump draws the water into the engine and radiator so you can fill it completely so there is no air in the system and avoid engine problems.
Now we’re going to add our chemical rinse and the whole thing.
Okay, let’s go for a lap. On our drive, the car runs great and maintains its operating temperature. We drive around for at least 10 minutes. The water and chemical flushing clean the cooling system while driving.
Pay attention to the temperature. Make sure you don’t have a problem with air in the system that could cause your engine to overheat. You want to make sure that you blow your heat all the way. You want to feel the heat, if you can’t feel the heat then you have air in your heater core and you may not have processed enough water.
Step #4
We drove around for about 15 minutes, the temperature was stable. So let’s go back and rinse out all of the water, then add our antifreeze and take another ride.
Now that we’re back from our ride, let’s drain the water from the cooling system and flush all of the dirt out of the cooling system. While we wait for the engine to cool down, we’re going to fill up the old containers with the old antifreeze, with that we can recycle it.
Take your old coolant with you, refill your previously used containers so you can recycle them. Your local auto parts store, your city recycling center, and many other places take this stuff with you so you can easily recycle it.
 Now, once your cooling system feels cool and the temperature gauge is low, let’s go under and drain the water. In order for the coolant to escape faster, remove the radiator cap or, in this case, the expansion tank cap, and that will only allow air to pass through here so that there is no suction when the water no longer drains.
And you think you haven’t figured it all out?
Starting the engine will cause the water pump to pump the remaining water into the radiator the worst. So that he could drink, give him something. Which is good, make sure you get all of the water out of there.
Step #5
You see, it’s pretty clear that we’ve gotten from the radiator to this which means our cooling system is pretty clean and we’re now can you change Jeep coolant to the brand new 50/50 antifreeze mixture.
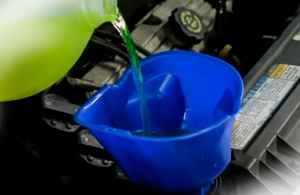
Before we do that. Let’s install the drain plug and make sure it clicks into place. So you have no leaks. Now let’s fill up the cooling system with a Coolant for Jeep Wrangler.
We use is compatible with all cooling systems, but be sure to check your owner’s manual. So that you know the right type of antifreeze to use, we know we need 3 of these gallons to fill the cooling system, not all containers we use, we know some water gets stuck in the cooling system, a little water is fine.
 But you don’t want too much because then your water to antifreeze ratio won’t be close enough to 50/50. We have our last bottle of antifreeze and when you run out of antifreeze you start with the end and it sucks it right down and you just add it to make sure your heater is on.
A little trick is if you turn it to the side and then pour it out it will pour smoothly so it doesn’t splash all over the place. Now we’re adding our anti-rust and sealing additive to our old engines and the additive prevents leaks by flushing the cooling system. Then our third bottle of antifreeze and we’re almost done.
So we know it’s completely full because we’ve added the right amount of coolant so we can take it out. And you can actually see it is filled to the brim where it needs to be filled, so now let’s put the cap back on and go around.
On our drive, the car runs great and maintains operating temperature. We also got the heater on and I could feel the heat rising, which is good, which means there is no air in the heater core, okay?
We came back from a ride and when you see the coolant temperature is exactly where it should be, we see here that the coolant temperature gauge is right in the middle where it should be.
This is a job well done!
This is how you flush a cooling system in a car. Hopefully, this article is helpful, thanks.
Add Comment